Asset Registry
Every physical tag you track (a tag attached to a forklift, a smart label on a pallet, a sensor on medical equipment) appears in Blecon Track as an asset. Assets give you a single view of where things are, where they've been, and what zone they're in, so you can make decisions based on real-time location data instead of manual checks.
For information about the physical hardware (tags, labels, hotspots), see the Hardware overview. To add new tags to your workspace, see Adding tags to Blecon Track.
What you see
Each asset shows:
- Current position: Where the tag is right now, displayed on the live map.
- Last position: When the tag last reported a position.
- Zone: Which zone the tag is currently in (if any).
- Status: Whether the tag is active (recently seen) or inactive.
- Trail: The movement path over a selected time period.
The assets list
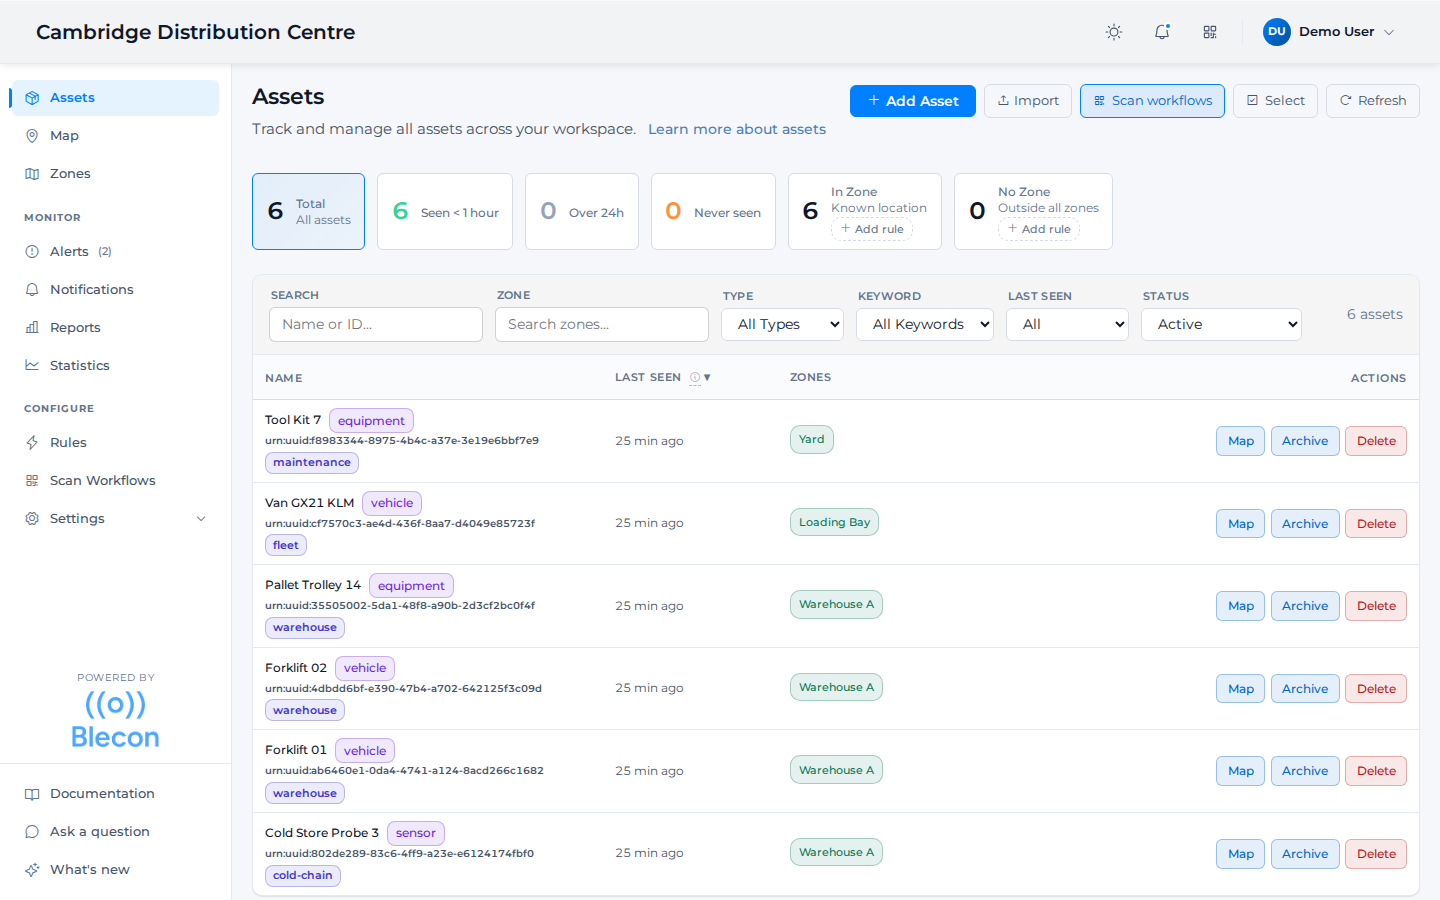
The summary tiles across the top break your fleet down at a glance: how many tags are in a zone, how many haven't reported in over 24 hours, and how many have never been seen. Each tile is a shortcut — the counts that matter to you can be turned straight into a rule.
The assets list shows all tracked tags in your workspace. You can filter by:
- Name or ID: Free-text search across asset names, tag IDs and custom-field values. A serial number read off the asset finds it, whichever custom field holds it.
- Status: Active (seen in the last 15 minutes) or offline.
- Zone: Assets in a specific zone, in any zone, or in no zone.
- Zone keyword: Assets in any zone carrying that keyword (see Zones). One filter covers every site that shares a keyword, so you do not pick the zones one at a time.
- Asset type: Category like "vehicle", "equipment", or "pallet".
- Tag: Any tag assigned to the asset (see Tags below).
- Custom field: Pick one of your own fields and type part of its value, or leave the field as Any field to search every value. A field with nothing typed matches every asset that has the field at all. See Custom fields below.
- Association status: Whether the asset has a parent or children.
Click any asset to open its detail page with position history, sensor data, and association information.
Exporting the list
Export CSV sits beside the result count and downloads the list exactly as you have filtered it — every match, not the page on screen. Each asset is one row: name, ID, type, team, keywords, current zones and their zone IDs, last seen, position and status. Zones appear as both a name and an ID, because a zone can be renamed and the ID is what stays the same. Every custom field becomes its own column, so you can open the file in a spreadsheet and match it against your own records on a field you already use, such as a purchase order number.
For JSON instead, click the arrow beside the button and choose it. The two files hold the same rows and the same columns; JSON keeps numbers as numbers, which suits feeding another system rather than a spreadsheet.
A large list takes a moment to prepare. The button says so and downloads the file when it is ready, so you do not have to keep the page open waiting for it to start.
If you are in a team, the file holds your team's assets only, the same as the list on screen.
Saved views
A question you ask every week does not need setting up every week. Filter the list, click Save as view, and name it. The view appears as a chip above the filters, and one click puts those filters back.
A view holds the question, not the answer. Opening one re-runs it, so it always shows today's position, and it shows each person what their own access allows: the same view opened by a supplier lists that supplier's equipment.
When you save a view you can also choose Break down by team, type or keyword. The view then shows a count for each group above the list — so one view answers "how many at each supplier" without a separate view per supplier, and a new supplier appears on its own.
A view is shared with everyone in the workspace, and the web address carries it, so you can send someone a link that opens the same view.
Getting a view by email
A view you read every Monday can arrive instead. Open the view, click the clock, and choose how often to send it — daily, weekly on a chosen day, or monthly — and the time.
Send to every channel does exactly that. Or pick a keyword, and it goes only to the channels carrying it — the list offers the keywords your channels actually use, so a send cannot be addressed to nothing. That is how each supplier receives their own copy: give the supplier's email channel a keyword, and pick the same keyword on the view.
The email carries the numbers, not just the file: the total, and a line per group when the view has a breakdown. The rows are behind a Download link rather than attached, because a list can run to tens of thousands of rows. The link opens the dashboard and the file downloads from there, so you will be asked to sign in if you are not already. The file is kept for seven days, and it holds only what the person opening it is allowed to see.
Send now produces and sends it immediately, so you can check the recipients before trusting a weekly send. It does not replace the scheduled send.
Views belong to the list they were saved on. A view saved on Devices appears on Devices and not on Assets, so the same name can mean "not seen this week" for handhelds on one list and for equipment on the other.
Tracking inbound shipments
Zone keywords, views and the export answer a weekly "where is our equipment" question without any extra setup:
- Put one keyword on every supplier site zone, such as
vendor, and another on every zone at the destination, such assite. - Give the equipment in scope a shared tag, such as
inbound. - At the supplier: filter by zone keyword
vendorand taginbound. - Arrived: change the zone keyword to
site. - On the road: set Zone to in no zone and keep the tag. An asset that has left a supplier and not reached the destination is in no zone.
Save each of the three as a view, broken down by team, with a team per supplier. Three chips then give you every supplier's count in each state, and you export whichever one you need.
Asset details
The detail page for an asset includes:
- Position history: A timeline of all recorded positions with timestamps.
- Last seen by: The Agent devices that most recently heard the tag, newest first. These are the phones or handhelds that were within range the last time the tag was positioned, whether or not their sighting was the one that placed it: the first thing to check when an asset goes missing. A tag that stays still keeps this list current, because every sighting counts, not only the ones that moved the pin. Only Agent devices registered in the workspace are named, and each links through to its own asset page. When another hotspot, such as a hub, has heard the tag more recently, the list shows Unregistered hotspot with the time of that sighting, so you can tell that the named devices did not hear it last. The missing-assets list carries the same information, and can filter by an agent keyword, so "what did the night-shift devices last see" is one query.
-
Location and Last Data: the two boxes at the top of the page. Location shows where the asset is and how old that location is: current, or for example 3 h old in amber. Beside the place name, the pin icon shows the coordinates when you point at it and copies them when you select it, and the shield icon adds a rule for the location. Last Data shows when the tag last sent anything: a position, sensor readings, or a sighting. It turns red, with not reporting, when no data has reached the workspace for 15 minutes or more, and shows Never when the tag has sent nothing since it was added. The sensor readings, such as temperature, humidity and battery, are on the row below.
A tag that sends only its location has no Last Data box, because its last data is its location. For that tag the Location box shows only the age, for example 2 h old, or never reported when it has sent nothing since it was added. Blecon can receive data from a tag and still not work out where it is, so an old location does not always mean that the tag is silent. Select the ? to see which applies.
When the location is old but Last Data is recent, the tag is still sending readings but its location could not be worked out. When both are old, the tag is out of range of every hotspot, or the hotspots near it are offline.
A tag has no GPS of its own. Its location comes from the hotspots that receive its data, so a hotspot must know its own location for the tag's location to be worked out. That is why a tag can report readings without a new location.
Select the ? after the location to see why. When the tag is reporting but has no new location, the panel names the cause where it is known: for example, that the phone which received its data does not know its own location, that its location was too old to use, or that positioning is turned off for the workspace. It also lists the hotspots that last gave the tag a location, and whether each one is online now (for the hubs and access points your account manages). When the location is current, the panel shows how the location was worked out, why it was shown as a new location (for example, that it was 23 m from the last one, more than the 15 m that counts as a move), and which zone it is in and which other zones competed. This part is a beta feature: it shows when beta features are turned on for the workspace. Each position in the history has the same button. When the asset has not moved, the panel says since when, and explains its latest position: the location on the map is then where the asset stopped, or the average of its positions since then. - Sensor data: Temperature, humidity, battery, and other sensor readings (when available). - Battery: The tag's supply voltage. Some tags also show an estimate of the battery life left, in weeks, with the voltage below it. The estimate comes from a model of that tag's cell, so it is approximate, and it never promises more than the tag's rated service life.
Lowmeans the cell is past the end of its useful voltage range. - Associations: Parent and child relationships with other assets. - Zone transitions: When the tag entered and left each zone. - Tags: Free-form labels you can add and remove inline (see below). - Custom fields: Key-value metadata set when the asset was added or updated via the API.
Anchors
An asset can be designated as an anchor directly from its detail page in Blecon Track. Anchors are installed at known fixed positions and act as spatial anchors for indoor positioning: they tell nearby hotspots which area they're covering, enabling accurate location without GPS.
To mark an asset as an anchor, open the asset detail page and enable the anchor toggle. You can then set the tag's network zone and floor. The change takes effect immediately.
Asset types
Every asset can have a type: a single category like "vehicle", "case", or "pallet". Types are free-form: you type a value and it becomes available for other assets in the same workspace. The assets list shows a Type column and filter dropdown when at least one asset has a type set.
Types are useful when your assets fall into a small number of distinct categories that don't change often. For more flexible grouping, use tags.
Tags
Tags are free-form labels you attach to assets for filtering and grouping. Unlike asset types (one per asset), an asset can have any number of tags.
Examples: floor-2, high-value, maintenance-due, building-a, customer-acme
Adding and removing tags
On the asset detail page, you'll see a Tags row below the stats bar. Type a tag name and press Enter to add it. Click the × on any tag to remove it. Changes save immediately.
When adding an asset (via the Add Asset dialog or the API), you can set initial tags at the same time.
Filtering by tag
On the assets list, a Tags dropdown appears when any asset in your workspace has at least one tag. Select a tag to filter the list to only assets with that tag.
You can also click a tag chip on any asset row to instantly filter by that tag.
Tags via the API
Tags are a string array on the asset resource. Set them when creating or updating an asset:
# Add an asset with tags
curl -X POST https://api.blecon.net/tracker/api/workspaces/{workspace_id}/assets \
  -H "Authorization: Bearer {api_key}" \
  -H "Content-Type: application/json" \
  -d '{
    "asset_id": "urn:uuid:550e8400-e29b-41d4-a716-446655440000",
    "asset_name": "Forklift #3",
    "asset_type": "vehicle",
    "tags": ["warehouse-b", "high-value"]
  }'

# Update tags on an existing asset
curl -X PATCH https://api.blecon.net/tracker/api/workspaces/{workspace_id}/assets/{asset_id} \
  -H "Authorization: Bearer {api_key}" \
  -H "Content-Type: application/json" \
  -d '{"tags": ["warehouse-b", "high-value", "maintenance-due"]}'

# Filter the asset list by tag
curl "https://api.blecon.net/tracker/api/workspaces/{workspace_id}/assets?tag=high-value" \
  -H "Authorization: Bearer {api_key}"

# List all tags in use
curl "https://api.blecon.net/tracker/api/workspaces/{workspace_id}/tags" \
  -H "Authorization: Bearer {api_key}"
Setting tags replaces the entire tag list. To add a tag, include all existing tags plus the new one. To remove a tag, send the list without it.
Custom fields
Custom fields let you store arbitrary key-value metadata on each asset: serial numbers, departments, purchase dates, or any other information your workflow needs.
Custom fields are set via the metadata object when creating or updating an asset:
curl -X POST https://api.blecon.net/tracker/api/workspaces/{workspace_id}/assets \
  -H "Authorization: Bearer {api_key}" \
  -H "Content-Type: application/json" \
  -d '{
    "asset_id": "urn:uuid:550e8400-e29b-41d4-a716-446655440000",
    "asset_name": "Forklift #3",
    "metadata": {
      "serial_number": "FL-003",
      "department": "warehouse",
      "purchase_date": "2024-06-15"
    }
  }'
Custom fields appear on the asset detail page under the Custom Fields heading. The keys are displayed as labels and the values alongside them.
You can also add and remove custom fields directly on the asset detail page. Click the edit icon next to the Custom Fields heading.
Filtering by custom field
The Custom field filter on the asset list appears as soon as one asset in the workspace has a custom field. Choose a field and type part of its value: department containing ware finds every asset whose department is warehouse. Leave the field as Any field to search every custom field at once. The filter is saved with a view like any other, so "every asset from purchase order 4471" can be one click.
The API offers the same, and more:
# Part of one field's value, case-insensitive
curl "https://api.blecon.net/tracker/api/workspaces/{workspace_id}/assets?metadata_key=department&metadata_search=ware" \
  -H "Authorization: Bearer {api_key}"

# Part of any field's value
curl "https://api.blecon.net/tracker/api/workspaces/{workspace_id}/assets?metadata_search=4471" \
  -H "Authorization: Bearer {api_key}"

# Exact value of one field
curl "https://api.blecon.net/tracker/api/workspaces/{workspace_id}/assets?metadata_key=department&metadata_value=warehouse" \
  -H "Authorization: Bearer {api_key}"

# Several fields at once; every pair must match
curl "https://api.blecon.net/tracker/api/workspaces/{workspace_id}/assets?metadata=department=warehouse&metadata=serial_number=FL-003" \
  -H "Authorization: Bearer {api_key}"

# The custom-field keys in use, for building a picker
curl "https://api.blecon.net/tracker/api/workspaces/{workspace_id}/metadata-keys" \
  -H "Authorization: Bearer {api_key}"
metadata_key on its own matches every asset that has the field, whatever its value. The search parameter of the asset list also reads custom-field values, so one search box covers names, IDs and fields.
Finding a tag
When you need to physically locate a tag, you can make it beep from Blecon Track. On tags with a built-in buzzer, the beep button is shown on the asset; sending it makes the tag beep and flash its lights so you can find it in a room, a vehicle, or a stack of pallets.
Because tags conserve power between connections, a beep is queued and delivered the next time the tag connects — usually within a few seconds, as Blecon Track asks the tag to connect promptly. While a beep is pending the button shows Cancel beep; it returns to Beep once the tag has connected and carried out the command, which is your confirmation that it was received. Cancel a pending beep at any time.
Archiving
Tags you're no longer using can be archived so they drop out of your live view without being deleted. Archived tags are hidden from the asset list, the map, and statistics, keeping your day-to-day view focused on what's in use. Use the Archived only or Include archived filter on the asset list to see them, where they carry an archived badge.
You can archive and unarchive a tag by hand from the asset list. Blecon Track can also archive tags for you: turn on auto-archive in workspace settings and set an inactivity period (1–90 days, default 30). Any tag with no position update for longer than that is archived automatically, and the check runs every hour.
Archiving is never permanent. Unarchive a tag manually at any time — and if an archived tag reports a new position, it is unarchived automatically and returns to your live view.