Register and scan devices
Get devices into the system fast, whether you're adding one or a hundred. Register through the Console, scan with your phone using the Blecon Agent, or automate via the API — and start tracking within seconds of the first hotspot detection.
Registering devices
Via the Console
- Open the Blecon Console and go to your network.
- Click Devices > Add Device.
- Enter the device ID (printed on the device label or found via scanning).
- Click Register.
Via the Blecon Agent
The Blecon Agent includes a scanner that uses your phone's Bluetooth and NFC to read device IDs and register them automatically.
From the Console:
- Open your network in the Console and go to the Register Device tab.
- Click Launch Scanner. A QR code appears.
- Scan the QR code with your phone. This opens the scanner in the Blecon Agent.
- Hold your phone near a Blecon device. The scanner reads the device ID via Bluetooth or NFC.
- The device is registered to your network automatically.
The scanner uses a temporary session token. Each session allows up to 50 device registrations and expires after 1 hour.
From Blecon Track:
The Tracker UI has the same scanner flow — click Add Device in a workspace, scan the QR code on your phone, and the device is added to the workspace.
Via the API
Register devices programmatically by calling the device registration endpoint:
POST /v1/accounts/{account_id}/networks/{network_id}/devices
Provide the device ID in the request body. See API keys for authentication.
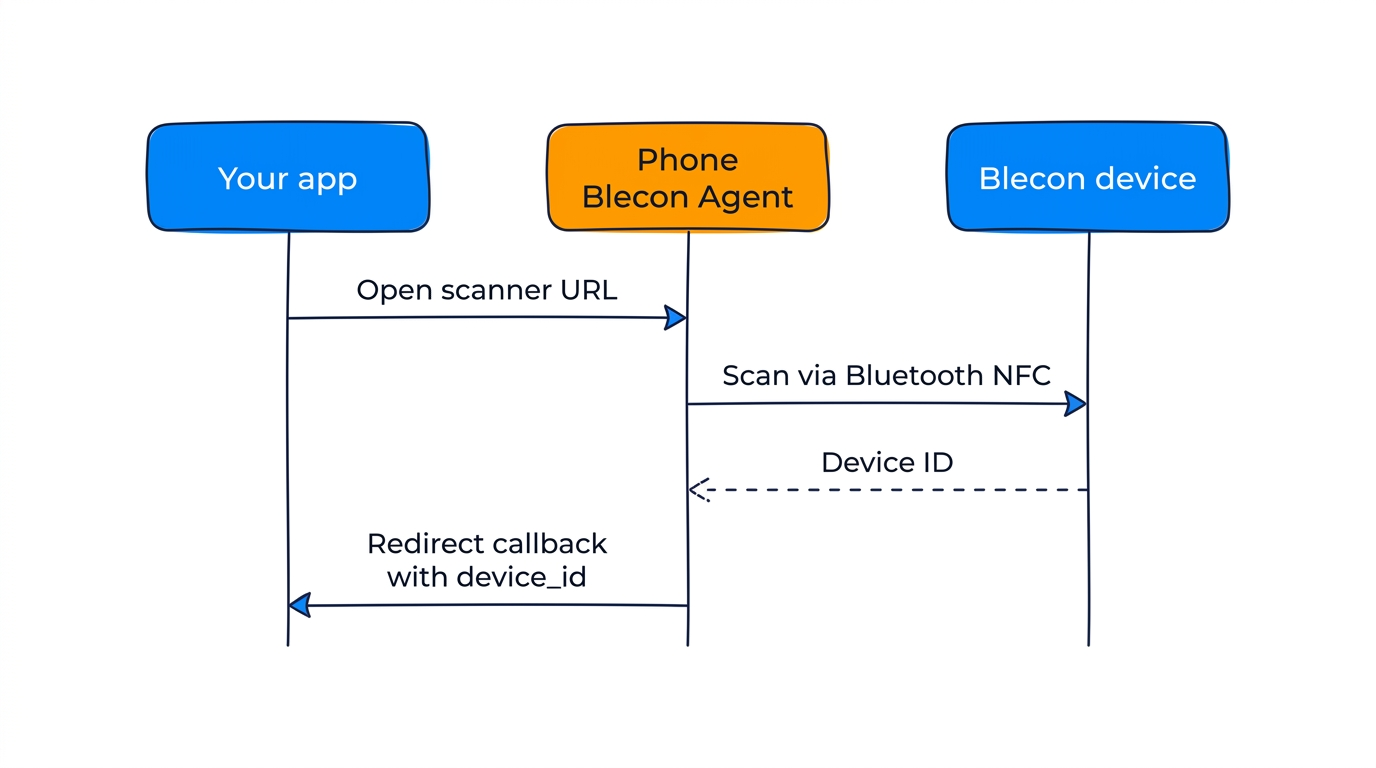
Integrating the scanner into your product
The Blecon Agent scanner is designed as a building block. You can invoke it from your own application and receive the scanned device ID back via a callback URL.
How it works
- Your application opens a URL in the format:
https://blecon.app/scanner?callback=<your-callback-url>
- The Blecon Agent scans the nearby device using Bluetooth or NFC.
- The scanner redirects the phone's browser to your callback URL with the device ID appended.
Callback URL format
Include the literal placeholder {device_id} in your callback URL. The scanner replaces it with the scanned device's URN before redirecting.
https://blecon.app/scanner?callback=https%3A%2F%2Fyourapp.com%2Fscanned%3Fid%3D{device_id}
After scanning, the phone navigates to:
https://yourapp.com/scanned?id=urn:uuid:550e8400-e29b-41d4-a716-446655440000
Supported placeholders:
| Placeholder | Value |
|---|---|
{device_id} |
Full device URN (e.g. urn:uuid:550e...) |
{uuid} |
Same as {device_id} |
{device_id_bare} |
UUID without the urn:uuid: prefix |
Example: QR code registration flow
A common pattern is to generate a QR code that encodes the scanner URL. Users scan the QR code with their phone, which opens the Blecon Agent scanner. After scanning a device, the phone is redirected to your callback where you can register the device, associate it with an asset, or take any other action.
This is the same pattern that both the Blecon Console and Blecon Track use internally.
Device ID formats
Device IDs are printed on the device label in one of several standard formats. See Supported device ID formats for the full list.
After registration
Once registered, the device appears in the Console under the network's device list. When a hotspot detects the device, you'll see:
- Last seen timestamp updated.
- Position calculated (if positioning is enabled).
- Events delivered to configured routes.